Popular Posts

Wednesday, June 6, 2012

Frozen Gobs (Whoopie Pies)

And here they are, as promised.....frozen gobs! Why the name? I didn't want to call them ice cream sandwiches because there's no ice cream and I didn't want to mislead by just calling them gobs.

Just for fun, I looked up "gobs" on Wikipedia and it asked if I meant "gods". hahaha NO. I didn't realize these things had so many different names....I think my new fave is "BFO". lol ANYWAY....

This is actually a Weight Watchers recipe. I was scared when I looked at the ingredients list....first of all, it has more ingredients than I usually care for....second, there's buttermilk in there and I've never used it before....third....LENTILS?! Yeah. Straaaaange. But, it takes away bad stuff and puts in good stuff and you can't taste them in the final product! They were a little difficult to eat because these cookies weren't really made for the freezer. Eh, live and learn.


Frozen Gobs (Whoopie Pies)

This is the cookie recipe: Devil's Food Cookies (only ONE point?!?!)

I made sure they were COMPLETELY cool (the heat will melt the cool whip!), plopped a little fat free cool whip on the flat sides, and smooshed them together GENTLY. Popped them in the freezer for about two hours, and voila!


****Points Plus Value: 2****
****Any variations to this recipe could change the points value!!****


Good, but not spectacular because of the hardness of the cake-like cookie. Next time? The cookies need to be thinner if I'm going to freeze them. Otherwise, I'll just plop some cool whip on one cookie and eat them that way! Room temp!

P.S. I didn't even realize that WW suggests making a "sandwich" out of these with whipped cream until I looked up the link to post on here. lol

Chicken Bacon Ranch Burgers

So, I think about this blog almost daily. "Hm, I wonder if I should post tonight's supper on my blog?" and "I wonder if anyone actually cares about the blog?" and "I should probably try to post to the blog tonight." I have about 4-6 recipes I want to share and already have the pics taken, but it seems like I just never have the time to write about them! Time just flies....I was thinking that it's been about a week since my last post, so I should add  a new one...it's been TWO WEEKS! Shame on me!

Memorial Day is like the "Official Summer Kick-Off" for our family. Clean off the grill, check the propane tank, open the swimming pool, buy flowers to plant outside, have a picnic, etc. When my mom asked what I wanted her to make for the picnic, the first thing that came to mind? Chicken, bacon, ranch burgers! Now, don't get me wrong....I love a good juicy hamburger, but these are my favorite. The kicker? I made up the recipe myself!

(shown on a whole wheat bun, before I dressed it up!)

Chicken Bacon Ranch Burgers
Ingredients
2 lbs. ground chicken
1 packet Hidden Valley Ranch dressing/dip mix (3 Tbsp according to the large canister I get)
2 oz real bacon pieces (at my local Wal-Mart, these are with the salad dressings and croutons)
**optional** 'burger fixin's (bun, onion, lettuce, tomato, cheese, ketchup, mustard, mayo, etc.)

Directions
(1) Mix all ingredients together, well.

(2) Form patties (I usually get 5 patties).

(3) Grill 'em on medium heat for about 10 mins., flip and grill for another 5 mins.

On my grill, this temp and timing cooks them the whole way through without overdoing it and drying them out. Other grills may vary!


****Points Plus Value: 4* JUST for the burger, no bun or anything else****
****Any variations to this recipe could change the points value!!****


Thank-you to all the service men and women who have, are, or will serve our country!

Tuesday, May 22, 2012

No-Guilt MICROWAVE! Chocolate Cake

That's right....chocolate cake in the microwave. When I first saw this recipe, I laughed and thought, "There's NO WAY that can taste good." But, now I'm a believer.

As I stated at the bottom of my last post, I started Weight Watchers. Yes, I'm trying to lose weight, but my main goal is to be healthier all around and feel better about myself. Of course, a few days into this lifestyle change, it hit....that "I NEED CHOCOLATE NOW!!" feeling gnawed at me and wouldn't go away. First, I tried a weight watchers recipe for brownie, but they were disgusting and just didn't do anything for me. Then, I remembered the microwave cake from a HEALTHY DESSERTS blog. Okay, when I think healthy desserts, all I can think of is fruit. What do you think of? Cake? Fudge? Cookies? No? Well, think again.

Recipe derived from Chocolate Covered Katie-Healthy Desserts Blog
She also has "special diet" recipes! Gluten-free, vegan, sugar-free, etc. Check it out!


It looks really small in this picture (must be the angle?), but it's actually about 4 inches in diameter, 1/2 inch thick? Just guesstimating!  :-)

This is how I made what is shown in the picture above. Katie says this is a single-serve cake, but it's too much for me. So, I divided it into three. She also gives lots of other options for substituting ingredients.

No-Guilt Microwave Chocolate Cake
Ingredients
1 Tbsp PLUS 2 tsp cocoa powder
3 Tbsp all-purpose flour
1/8 tsp salt
2 Tbsp sugar
1/4 tsp baking powder
3 tsp unsweetened applesauce
3 Tbsp skim milk
1/2 tsp pure vanilla extract
**optional** Cool Whip, "Free" (fat free, only 1g sugar per serving)
**optional** Strawberries for garnish

Directions
(1) Mix all DRY ingredients in a regular size soup/cereal bowl. MIX WELL!!!

(2) Add liquid ingredients and mix.

(3) Divide mixture evenly between three ramekins or small soup cups.

(4) Microwave for 30-50 seconds, depending on microwave wattage. (I do mine for 50 seconds and still have a small runny spot in the middle of the cake, but that's fine with me!)

(5) Top each cake with a dollop of cool whip (2 Tbsp is a serving) and sliced strawberries, if desired.

****Points Plus Value: 2****
****Any variations to this recipe could change the points value!!****

A dessert worth ONLY 2 points and involving chocolate is monumental to me. I'm SUPER picky and this is more than good enough to satisfy that chocolate craving! Next time, I'll leave out the strawberry though, because I'm weird about mixing fruit and chocolate....unless it's Hershey's chocolate covered strawberries!!!

Next dessert attempt? Frozen gobs! Stay tuned.....

Bacon, Egg, and Cheese Bites

I absolutely have to have breakfast in the mornings. I've exhausted my SmartOnes Breakfast Quesadillas plus they're expensive plus they don't hold me for very long, oatmeal is a good go-to but I have to be in the mood for it, and I have a great almond and banana smoothie that  lasts me until lunch so I don't have to snack around but sometimes I just need something to chew on. I wanted something QUICK and EASY (notice a theme with the recipes I post?) and not super expensive, so I threw some things together aaaaaand....yum!

Alexa has an aversion to anything with "green stuff!" in it (parsley, in this case), but I convinced her to try these and she LOVES them.

***This recipe is for a single serving, which is six "bites". Feel free to double, triple, etc. and store left-overs in the fridge for a quick-grab breakfast on those days you hit the snooze button too many times! Reheat 30-40 seconds in the microwave.***

Bacon, Egg, and Cheese Bites
Ingredients
2 eggs
1 Tbsp real bacon pieces (at our Wal-Mart, they have bags of these in the salad dressing/crouton aisle)
1 Tbsp grated parmesan cheese
2 Tbsp skim milk
1 tsp garlic salt
2 tsp dried parsley

Directions
(1) Pre-heat oven to 375 degrees F.

(2) Pour all ingredients into a regular soup/cereal bowl and whisk or beat with a fork until well blended.

(3) Scoop mixture into mini-muffin pan, until about 1/2 to 3/4 full. (I use the smallest Pampered Chef cookie scoop, but I'm sure a regular spoon would work just fine. MAKE SURE to scoop down into the bottom of your bowl because the bacon and cheese will settle to the bottom!!!)

(4) Bake for 12-15 minutes.

Before baking.
 These will puff up in the oven.
 This was taken as soon as I took them out of the oven...you can see they already started to deflate.

On a side note: I started Weight Watchers, so I'm going to start posting Points Plus values, just in case anyone else is doing the same. :-)

****Points Plus Value: 5****
****Any variations to this recipe could change the points value!!****

Other variations:
**A. I quadrupled this recipe so I could pull them out of the fridge and reheat as needed, but I also added spinach and mushrooms to sneak some veggies into my system. I used my Pampered Chef manual food processor to dice the spinach and mushrooms SEPARATELY so they would be fine enough to beat into the egg mixture. They were awesome! Play around with it....maybe crumbled sausage or finely diced ham instead of the bacon....crumbles of feta....finely diced onions and green or red bell peppers....be creative! (Just make sure everything is FINELY diced/crumbled since these are minis!)

Wednesday, May 9, 2012

Chicken Vegetable Pot Pie

Sorry about the delay for getting this posted. We had a MAJOR thunderstorm which knocked out our internet for a few days until they could FINALLY come and replace our internet modem which was fried by lighting. AND this is "dance recital week". Crazy, busy, STRESSFUL! *Ahem*.....

Who doesn't love comfort food? Seriously. I don't have a story for this one except that the crust recipe was a gift from my bridal shower and the rest I just kinda threw together and it worked. I love it. My husband and I have to do 'paper/rock/scissors' to decide who gets the leftovers.

Chicken Vegetable Pot Pie

CRUST:
2 cups flour
3/4 tsp salt
2/3 cup butter flavored shortening (CHILLED!!!!!)
4-6 tbsp COLD water

FILLING:
16 oz. bag of frozen mixed vegetables (I use without potatoes, but feel free to use with...or add your own.)
1 cup of chicken gravy
2 cans of chunk chicken

DIRECTIONS:
(1) Pre-heat oven to 450 degrees F.

(2) Sift flour and salt together. (I don't have a sifter, so I just throw it in....which is probably why I have a hard time rolling the stuff out. lol) Cut in shortening using two knives, a pastry blender, or the dough hook on your mixer. Add small portions of water until the mixture holds together.

(3) Split dough about in half, allowing a slight bit extra for the bottom 'half'. Roll out on a floured surface to about a 10 inch circle and a 9 inch circle. Line your pan with the larger circle and set aside.

(4) In a large bowl, mix frozen veggies, gravy, and chicken. Pour into your crust lined pan and place the 'cover' crust on top. With fork or fingers, press to seal edges. Make sure to cut vents in the top!

(5) Bake at 450 for 15 minutes, then *REDUCE* temperature to 350 degrees F and bake another 45-50 minutes.


A few notes on this....

1. I used regular shortening for the crust this time around, because I wasn't paying attention. I was in a hurry! The crust still tasted good, but I like the added butter flavor.

2. I lost some of my gravy down inside the burners on my stove as I was preparing it (from a packaged mix) because my daughter begged to help, so I assigned her the "gravy stirrer" position....and she got distracted by Big Time Rush. She's too young to start the boy band thing....

3. I didn't bake it long enough, which is why it looks a little watery in the pictures. Again, I was in a hurry.

4. I used my "Temp-tations" 9 inch deep round dish and doubled everything EXCEPT the crust recipe. That part still works out. That way, we get more veggies and chicken, not as much crust....because that's where the fat and calorie danger really lies....

5. I didn't take pictures throughout the process. Why? See above "hurry" excuse. Plus the gravy boiling over. I was frazzled. It was simply NOT my day....until I ate and was comforted. :-)

Wednesday, April 25, 2012

Mini Corn Dog Muffins *Edited*

I'm always ready for warm weather, so the FIRST day it gets anywhere near 70 degrees, I'm ready to dig out the flip-flops and capris, plant some flowers, fire up the grill, and start making some "summer food"! Pennsylvania weather is CRAZY. Friday it was in the 70s-80s....Sunday night, it snowed! To cheer myself up after seeing those pretty but pesky little snowflakes, I decided I wanted corn dogs. Yes, I know they're just soooo healthy with their sodium packed, processed, mystery meat links dipped in a thick, sugary batter then deep-fried in fatty oil to a dark golden brown....but it's a weakness. And they make me think of carnivals and amusement parks and fairs and everything wonderful about SUMMER! Since I didn't have a stash in my freezer, I thought I'd make a mad dash to Wal-Mart to get some, but then I remembered something I had seen on-line somewhere before....corn dog muffins! I just so happened to have some corn bread mix lying around and a package of hot dogs in the freezer, so this is what I did:

Mini Corn Dog Muffins
Ingredients
store-bought cornbread mix OR homemade cornbread batter**
hot dogs (your choice of what type! and the number needed depends on the size of your cornbread recipe: I used 12 with about 3-4 'chunks' left over)

Yep, that's it!

Directions
(1) Preheat oven according to cornbread directions.

(2) Mix the batter and scoop into your mini-muffin tin(s). Fill them about 3/4 of the way. (I didn't grease my tins or use any muffin cups and had no issues with sticking!)

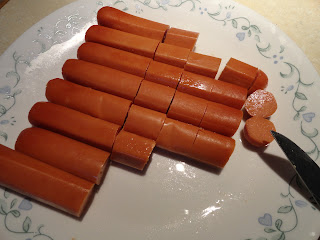
(3) Cut the puckered tips off both ends of the hot dogs, then cut in approximately 1 inch pieces. (I got five pieces from each hot dog....and Alexa enjoyed eating the leftover ends!)

(4) Press the hot dog chunks (vertically!) into the middles of your batter-filled muffin cups.

(5) Bake according to cornbread directions.

**I used Krusteaz Natural Honey Cornbread mix, but I don't see why you couldn't use just about any cornbread mix or homemade batter! This kind is pretty "gritty", but has a delicious sweet flavor. The box says it makes 24 mini-muffins, but I'm pretty sure we made closer to 40.

 (2)
 (3)
 (4) Alexa had to help!
 (5)
 Finished Product

So, were they as good as a real corn dog?

No.....

These were SO much better! Not only are they healthiER, but they had more flavor! And you don't have to worry about biting the stick! haha This is a great way to get your kids involved with helping in the kitchen. It's almost impossible to mess these up and so what if they're not exactly in the middle?! What kid doesn't love hot dogs?! HUGE hit with my family and they disappeared FAST. My husband ate twelve in one sitting!

Other variations:
**A. Make "normal" size muffins. If you want to go this route, your best bet would be to dice up the hot dogs and mix them into your batter. You're more likely to have a better hot-dog-to-cornbread ratio that way, because one hot dog chunk wouldn't be enough and two chunks would probably be too much.

**B. Breakfast! Have you ever seen the breakfast version of corn dogs? It's sausage links dipped in pancake batter! Maybe I'll try this for our Sunday school class one of these weeks....  :-)


>>>>>>>>>>EDIT<<<<<<<<<<
I tried out the Breakfast route because I'm in desperate need of quick, easy breakfasts for every day. They turned out okay, but I DEFINITELY need to find a sweeter pancake batter....or make them with mashed bananas in the batter....let me know if you come up with a tasty idea for this!

I used pre-cooked turkey sausage and plain, store brand pancake batter, following all the same directions as above. We dipped them in syrup for a little more "oomph", since these were seriously lacking in the sugar department.

Wednesday, April 18, 2012

Cheesy Chicken Noodle Casserole

Cheap, quick, and easy. Ah, yes. My FAVORITE kind of recipe. You know what makes it even better? It tastes good! I got the idea for this from my mom, who got it from my aunt, who got it from....somewhere else...? It was actually a side dish involving frozen, diced, hashbrown potatoes and it's always the first thing to go empty at potlucks and parties. Just as popular with kids as it is with adults! That's another plus. I liked it so much, I decided to put my own spin on it.

Cheesy Chicken Noodle Casserole
Ingredients
1 stick of butter, softened OR melted
16 oz. sour cream
16 oz. condensed cream of chicken soup (one "family size" can)
2 cans of chunk chicken (10 oz. each)
12 oz. wide ribbon noodles
1 cup shredded cheddar cheese (or as much as you like!)

Directions
(1) Preheat oven to 350 degrees F.

(2) In a large bowl, stir together butter, sour cream, soup, and chicken.

(3) Carefully fold in the noodles until completely covered with the wet mixture. Pour/scrape into a 9x13 cake pan/baking dish and cover with foil.

(4) Bake for 45 minutes COVERED with foil. When finished, uncover and sprinkle on the shredded cheese. Bake an additional 5-10 minutes UNcovered until cheese is melted.

(2)
 (3)
 Finished Product

This is a great meal if you don't have a whole lot of extra time for prep and maybe need another family member to pop it into the oven for you. Example: I mixed this up last night, stored it in the fridge overnight, then had my wonderful husband put it in the oven about 30 minutes before Alexa and I got home today. 

**NOTE: If you do store it in the fridge overnight, add about 10-15 minutes to the bake time!

Oh, and this re-heats in the microwave really well. Yet ANOTHER plus!

Other variations:
**A. Take out the chicken and noodles, substitute a bag of frozen, diced, hash brown potatoes and you've got an awesome side dish! (the original "recipe" this was derived from)

**B. Use fresh/frozen chicken. I use canned because it's cheaper, quicker, and easier and we like it. If you don't like canned, get a pound of fresh/frozen chicken, cook it, dice or shred it, and substitute.

Tuesday, April 10, 2012

Baked Asparagus Fries *Attempt #1*

I really, really, REEEEEEALLY want to like asparagus. It's good for you and I want to eat/make stuff that's good for me and my family. But I haven't found a way to make asaparagus palatable....YET. I tried dicing it once and mixing it in with some chicken sausage alfredo....needless to say, we all pushed the bitter, mushy, stringy asparagus chunks to the side. Bleh. Once upon a time, I was browsing facebook and clicked on someone's pinterest link, one thing led to another and I spent hours looking at recipes. (This string of events happens entirely TOO OFTEN!) Ta daa! I found baked asparagus fries. I love the green bean fries at TGIFriday's (although, they're deep fried). I've also made baked zucchini fries in the past and they were pretty awesome. So, I thought maybe this would be the path to success. Well, it came close. Close enough that I want to try it again, BUT not without changing a few things.

Baked Asparagus Fries
Ingredients
1 bunch of fresh asparagus
1/2 cup flour
2 eggs
2 Tbsp milk
2 cups Italian bread crumbs
2 cups grated parmesan cheese
*Optional: Ranch dressing for dipping

Directions
(1) Heat oven to 375 degrees F.

(2) Cut off the "woody" end of the asparagus, then cut the spears in half. (If you prefer, you can also trim the tapered end....I think I'll do so next time.) Wash thoroughly.

(3) Place flour on a small plate.

(4) Crack eggs into a small bowl, add milk, and beat with a fork until the yolks are mixed in well.

(5) On a large plate, mix bread crumbs and cheese.

(6) Dredge! Take a few pieces of asparagus at a time. Roll in flour (not much will stick!), dip in the egg wash, then roll and cover in the bread crumb mixture.

(7) Bake for 15-20 minutes or until desired "doneness".

(2) This is after we were already half-way done...

(3)

(4)

(6)

Finished Product

In the end, these were just okay. Alexa ate one and said, "Hm, I'm not so sure. Let me try another one." After her second, she said she liked it. By about the fourth or fifth, she goes, "I changed my mind," and made a funny face. So, I broke out the ranch dressing....she liked them for about five or so "fries" before she said she changed her mind again. lol

Variations that might help:
**A. Panko instead of the bread crumbs. It would give them a better crunch.

**B. Higher baking temp. After eating a few, I cranked the temp up to 425 and put them back into the oven for another 10 mins. It helped give them a better crunch.

**C. Different dredging technique! Talk about time consuming! Alexa helped me with these and to do one whole bunch of asparagus it took us at least 45 mins.

Friday, April 6, 2012

Chewy Coconut Oatmeal Cookies

I signed up to make cookies for our church's annual Easter egg hunt and COMPLETELY forgot until late in the afternoon the day before. *gasp* Don't you just hate that?! So, I open my refrigerator to see what fun things I might have and find half a bag of coconut left over from the week before from when my daughter, Alexa, and I assembled hamburger cookies. (Future post!) Off to the vastness of the internet I went aaaaaand....presto! This is what I found!


Courtesy of Hershey's Kitchens

Chewy Coconut Oatmeal Drop Cookies
Ingredients
3/4 cup (1 1/2 sticks) butter or margarine, SOFTENED
3/4 cup granulated sugar
3/4 cup packed light brown sugar
2 eggs
1 teaspoon vanilla extract
2 cups all-purpose flour
1 teaspoon baking soda
1/2 teaspoon salt
2 cups sweetened flaked coconut
1 1/2 cups quick-cook oats

Directions
(1) Heat oven to 350 degrees F.

(2) Beat butter and both sugars on medium speed until well blended.

(3) Add eggs and vanilla, let it blend. Add flour, soda, and salt, beating until well blended.

(4) STIR in coconut and oats. (This dough is THICK so it's probably not a good idea to use your mixer for this step....I set my KitchenAid to the "Stir" setting, poured in the oats and coconut, and then shut it off to finish stirring by hand)

(5) Drop by teaspoons onto ungreased cookie sheet. (I pressed my dough balls down a little bit with my fingers to give them a nicer shape.) Bake 8 to 10 minutes or until edges are lightly browned. (With my first batch, I had to bake 12 mins. Second batch was 8 mins.)

The recipe says it yields about 5 dozen....with my first batch, I used Pampered Chef's medium cookie scoop and got about 4 dozen. But, with the second batch using Pampered Chef's small cookie scoop I got exactly 5 dozen...plus one cookie.

(2)


(3)

(4)

(5)

Finished Product


Verdict? I was afraid I wouldn't like the texture, but it's really not bad and the taste overrides any weirdness I would have had over texture anyway! LOVE the taste, but the look was....well, boring. I was making these for KIDS who are extremely reliant on their sense of sight. And they were kind of big. Soooo, I bought another bag of coconut (yes, I made these so I could use the half bag that was in my fridge and now I have a different half bag sitting in there. *sigh*) and, because the cookies very slightly reminded me of birds' nests, some pastel colored Easter themed plain M&M's to use as "eggs" for in the little "nests". (If doing the M&M's thing, make sure to PRESS the candies into the cookies IMMEDIATELY after removing the cookies from the oven or else they won't stick!)


Soooooooo cute! Love them! Not only did it make them more eye pleasing, but hello? Added bonus of chocolate! Oh, and Alexa approved, so I'm a happy momma.

HAPPY EASTER!!!!

Wednesday, April 4, 2012

Welcome!

Welcome to my brand new blog! I'm mostly doing this to share fun and/or delicious recipes I find, my tweaks to them, my epic fails in trying to recreate them, and my triumphant successes in the culinary world! Or at least my own, personal culinary world. haha I love to try out new recipes I find anywhere and everywhere and I love just throwing things together to create my own masterpieces. My goal is to post AT LEAST once a week....although if I have the time, it could be more. I may end up including some random things about my life, but the sole purpose of this blog is to share some of the awesome things that can be done with food! So, thanks for reading and I hope you all enjoy!  <3